Scholarly Solidarity and Me

This blog post is, in part, a positionality statement and an autoethnographic reflection for my new Political Communication piece, “Scholarly Solidarity: Building an Inclusive Field for Junior and Minority Researchers.” As with all authors, what I write reflects who I am. That includes being a woman, a second-generation Asian-American, a millennial, and a New York native, all things that preceded my academic journey but regularly impact my career. However, for the past 12 years or so, I’ve taken on a professional identity: that of an academic scholar.

As a child of immigrant parents, this was not a profession I knew existed growing up (let alone wanted). This is atypical within the academy, as many academics tend to have parents with a graduate degree. And yet, I took to academia like a duck to water. I liked writing and I liked thinking about society, so a career where I would get to write (and teach and learn) about society made a lot of sense.

However, sticking with an academic career was not only a matter of “fit” (or “ikigai”). And, as I reflected upon my brief academic journey, for both my Scholarly Solidarity piece and for my annual reviews, an important thing dawned on me.

I have been blessed with, by and large, a supportive and welcoming community. This began as early as my undergraduate years, when I worked with Dr. Atsushi Tajima. He took me on as a student even with my abysmal 0.9 GPA (my undergrad GPA remained below 3.0 for my entire time in college). While I do have some horror stories, most of the senior faculty and PI who I work with and learn from are overwhelmingly generous to me, including (but not limited to): Brad Gorham, Hub Brown, Guy Golan, Lew Friedland, Dhavan Shah, Mike Wagner, Doug McLeod, Jon Pevehouse, Talia Stroud, Gina Masullo, and Sharon Strover.

This is not a typical experience for a graduate student. Amazing and brilliant Master’s and Ph.D students are routinely exploited for their labor. In a publish or perish atmosphere, you are encouraged to see potential collaborators as competitors. And the pressures from the academic hierarchy and limited job prospects contribute significantly to poor mental health among academic researchers.

These problem are not limited to grad life: they can be exasperated as a post-doc or junior faculty, who are paid more but are still often exploited for service, or given ambiguous benchmarks to achieve. And of course, such problems are amplified for female and under-represented scholars, not only at these early stages in their career, but throughout their professional careers.

But there’s no reason why it can’t be better. If we want this profession to continue thriving, we need to do a lot more to support one another. This includes prioritizing collaboration over competition, calling out blatant exploitation, supporting researchers who are harassed or threatened, extending grace when possible, and maintaining relationships with people who transition between academic and non-academic positions.

One reason why this matters a lot to me is because I am a young academic. People remind me about this a lot (which, fair, I’m the equivalent of a toddler in the temporal schema of an academic lifespan). But this makes me even more motivated to build solidarity among scholars. If I hope to be in the field for a long time, and I do, I want to work in a profession that is more equitable, thorough, and self-reflexive.

The importance of solidarity and community became all the more important during the COVID-19 Pandemic. I defended and started my Assistant Professorship during the pandemic (August 2020, to be exact). In many ways, I had never felt so alone, professionally and personally. As someone who enjoyed being a part of an academic community, it was frustrating to lose the ability to do that at a critical point in my career: the start of my tenure track clock.

The silver lining of the pandemic for me was the Media and Democracy Data Cooperative. Realizing that there was no difference between being on a zoom call with my students or with my collaborators, I wanted to build a (largely virtual) community of political communication and social media researchers who could support each other both infrastructurally and intellectually. MDDC helped me get a better sense of what scholarly solidarity could look like, and what it meant for researchers to support one another, within and across institutions, for the pursuit of knowledge.

My thoughts on scholarly solidarity are built on these experiences, including minimizing the harm I and many scholars can experience while also maximizing the things I love most about being an academic: doing good research with good people. I am endlessly grateful my many colleagues and collaborators (junior, senior, and non-academic researchers), who inspire and support not only my work and my professional aspirations, but my existence as a human. Thank you for showing me what scholarly solidarity looks like.

Of Working Faraday Cages and 5G

About a month ago, I ran across this funny tweet about people buying Faraday Cages or mental router covers to block 5G:

I got really curious about what the Amazon reviews cumulatively looked like, so I did a small data collection of reviews from 33 different “Faraday cages” (and bags).

For folks who are unfamiliar with Faraday cages, these are encasings (typically of conductive mesh) which are used to block whatever is within the cage from electromagnetic fields. If put around a router, a Faraday cage would naturally block out all internet signal (and if it doesn’t, it wouldn’t actually be a Faraday cage). In other words, buying a Faraday cage to enclose your wireless router would defeat the purpose of having a wireless router.

Amazon Faraday Cages & Router Guards

Though attention to Faraday cages and router guards on Amazon appears to be pretty recent, some of these things have been sold on Amazon for several years. Pre-2020 reviews show that people initially bought these wanted to cover smart meters, which are often installed by electricity suppliers.

More recently however, people have been purchasing these covers to block from 5G Routers. In fact, there has been a notable increase in the number of verified reviews about these products.

Throughout the time span, verified reviews of the products range greatly from folks who are convinced that using a router guard has deceased their headaches/improved sleeping to people complaining that the product has made using the internet impossible. One common feature of the positive verified reviews was an emphasis on how the guards would block elites (electric companies and governments) from “getting inside my brain.”

review_3.png

However, there were also reviews of folks complaining that their internet was no longer accessible.

Another big reason why some of the Faraday cages/bags were poorly reviewed was that they were too small for routers. This was an especially common critique when people wanted to use cages for smart meters to cover their router.

Unverified reviews typically took on two types of flavors: (1) mocking those who had genuinely bought the product or (2) corrective information that tried to explain why these products are basically pointless. Notably, since the December 2, 2020 tweet, the number of unverified reviews has grown considerably.

review_4.png
review_6.png

Unsurprisingly, the most common positive sentiment words (when using the Bing sentiment dictionary) focused on its ease of use and how it “worked perfectly” (this was said both sarcastically and genuinely). Negative words either focused on the “harmful” effects of electromagnetic fields (headaches, cancer, etc.) or criticized the cages for being a scam or joke.

Though the results were pretty unsurprising, this was a good exercise in playing around with Amazon reviews! Plus, with my first semester of teaching over, I’m hoping I can be a more active blogger.

The data and code for this analysis can be found on my github, here.

Personal Updates and Moving During COVID-19

Wow! I did not realize how long it had been since I have written in this blog (not since December of 2019). A lot has happened to the world (and to me) since that time, so it’s worth beginning with a few updates:

  • Earlier this year, I accepted an Assistant Professorship (tenure-track) at the University of Texas, Austin’s Journalism & Media School. I’m thrilled to have the opportunity to continue doing research on global mis-/dis-information and political language in an esteemed and inviting department.

  • I’m very close to defending! I will be defending in early August (a little over a week from now). My dissertation focuses on perceptions of U.S.-China trade from 2008 to 2018, and the role of news media and economic context in explaining people’s understanding of their local economy and national politics.

  • A co-authored paper with fellow Ph.D student Jordan Sallis (the lead author, and a rising second-year) was accepted to AEJMC 2020 (which is virtual this as, like ICA 2020, and all other conferences).

  • My long-time partner and I got engaged a few days ago!

My transition from Ph.D candidate to Assistant Professor this summer is consumed by the COVID-19 pandemic. From the largely virtual goodbyes (though I did see some folks in my last week) to the stressful packing and traveling process, moving during COVID-19 has been a uniquely stressful and anxiety-inducing experience.

Given the unique historical time point of my move (from Madison, WI to Austin, TX), I thought it would be worth recording my experiences here.

My COVID-19 Move Journal #1: Packing and Leaving Wisconsin

Packing and leaving Wisconsin was one of the saddest and most frustrating experiences I have had in graduate school.

Though we scheduled to have movers arrive on July 30th at 3:00 p.m., they did not arrive for another 28 hours, on July 31 at 7:00 p.m. Throughout this time (and now still), my partner and I had very little knowledge about why the movers took so long, but the broker we were working with emphasized how COVID-19 slowed down all the moves being scheduled (though it does not explain why we were lied to—there were several times where the broker or driver told us they would arrive “in 20 minutes” or “in two hours,” only for us to be told it would be “six hours from now” less than an hour later).

In any case, the movers did eventually arrive. It took about three hours to fully load the truck. During that time, my partner and I wore masks. About an hour into our packing, two neighbors who we did not know walked out of their apartment and saw us. Noticing that we were wearing masks, the two men began harassing and heckling us for wearing masks while we were moving. Leaning against their car (about 15 feet away from us), they repeatedly made sheep sounds (“Baaa”) and described us as “sheeple” and “idiots.” When we didn’t respond, they proceeded to loudly say that I probably couldn’t understand them. On several occasions throughout the move, for two full hours, these two individuals took immense pleasure in staring at us, calling us “libtards,” and continually bleating at us.

To say it was frustrating would be an understatement. It made an already incredibly bad moving experience so much worse. I was perpetually anxious to leave the house because every time I was within their field of vision, they would make comments (they were less vocal when they saw my partner, a white man who was also wearing a mask).

But it also made me think a lot about the state of my local civil society. In New York, and when I lived downtown in Madison, I had good relationships with my neighbors. However, at the time of the move, we had been living in our apartment for only a month (due to a leasing issue that is a whole story of its own). We didn’t know our neighbors well this time. But, I didn’t anticipate such disdain from a neighbor I didn’t know. These two individuals decided it was worth their time to make our moving experience worse, without knowing us, without ever having interacted with us, and without any consideration, seemingly, of social decency. If they disagreed with the mask policy, they could have just as easily minded their own business instead of bothering us.

It is interesting to think of masks as a political statement rather than a function of a health epidemic. And it is frustrating that strangers can resent you so much for wearing a mask that they would go out of their way to make your life worse.

What it is not, however, is surprising. Since March of this year, conservative politicians and opinion leaders (and President Trump in particular) have frequently framed people taking COVID-19 seriously as “harmful” to American society.

An example tweet describing Democrats as

An example tweet describing Democrats as un-American

It’s worth noting that liberals also call conservative un-American, but (anecdotally speaking) liberals doesn’t seem to evoke “un-Americanness” as a critique as frequently as verified conservative accounts decry un-Americanness.

These tweets, and my experience moving, reminded me a lot of sociologist Jeffrey Alexander’s social binaries. In The Civil Sphere, Alexander (2006) describes how people use binaries to identify which roles, relationships, and social structures are beneficial to civil society (logical, rational, independent, strong) and which are detrimental (illogical, irrational, dependent, weak). By applying these binaries, people make sense of which values or actions deserve to be celebrated (i.e., protected in the civil society) and which values or actions deserve to be ridiculed (i.e., rejected in the civil society). For these two men, me wearing a mask fell into the latter category, which warranted their harassment.

We expect these binaries in many aspects of politics. Certainly, political Twitter lives for this binary, as negative and controversial tweets tend to receive more attention on the social media platform, particularly among U.S. conservatives (Himelboim et al., 2014). However, I didn’t know how to make sense of when this binarization bleeds into our lifeworld; when two men are more interested in harassing you for a choice that has nothing to do with them than even minding their own business.

And sure, it’s easy to chalk it up to the two men being “stupid” or “idiotic,” but it doesn’t explain why and how they got to the point where they had no qualms harassing people they didn’t know.

In the days of COVID-19, we have reached a point where citizens (a more patriotic person might say, “fellow Americans”) treat mask-wearing (or not) as a visual symbol of “un-Americanness.” In the days of COVID-19, it is easier to harass someone you see as detrimental to society than engage in any constructive behavior. In the days of COVID-19, we rarely acknowledge that people live complicated and stressful lives (made all the more stressful with the pandemic), and are quick to cast the first stone.

My partner and I left our apartment quickly after the movers left. We didn’t want to be outside with people harassing us anymore. But the moment stayed with me, as a reminder of how quick we are to designate people we don’t truly know as “bad”—illogical, weak, and ignorant.

Frankly, I have no interest in continuing that cycle. People are too complicated to categorize them purely into “good” and “bad” binaries. If we are to survive this pandemic as a society (and it’s hard to say at this point whether that will happen), extending kindness during this stressful moment in history is essential.

To the two men, whoever you are: I hope you are safe and COVID-free. I know you can’t understand this, but I wore the mask for your protection, too, even if you hated me for it. And your harassment said a lot more about you than it did about me.

After the move, my partner and I went to a hotel to rest and recover before the start of our three-day drive down to Texas. In Dane County (and Hilton hotels) there is a mandatory mask requirement. At one point, we were in the elevator with an older couple who saw us and had an “oh s***, I need to put on my mask” moment. She apologies profusely while rummaging through her bag for her mask. I told her it was alright—mask-wearing is a new practice in our society, and we are all doing our best during these stressful times. The woman gave me a grateful look as she put her mask on. In that elevator, six feet away, she and I shared a moment of comfort and a mutual acknowledgment that, in the era of COVID, we are all simply trying to do our best.

Daily Tracking

Habit Tracking. It’s a really popular trend in bullet journaling, despite not being part of the original rapid logging system. And it’s that way for a reason: people like to see the progress they’ve made, or habits they’ve kept up with. Sometimes they’re functional or necessary, like taking medication or tracking the number of hours you sleep. Sometimes, they’re aspirational, like workout trackers or recording the number of pages you write every day. There are tons of activities you can track and many ways to track them, both physical and digital.

I use a few trackers to look at what I do every day. One of my favorite things to do is look at past habit tracker pages to see what I was doing at any given week (and with a discbound planner system, I can actually pull all the habit tracker pages out and look at them together)!

In the beginning of 2019, I tried maintaining monthly and weekly trackers. By March, however, I had completely switched over to weekly trackers—I just don’t have the patience to keep flipping back to update a monthly tracker!

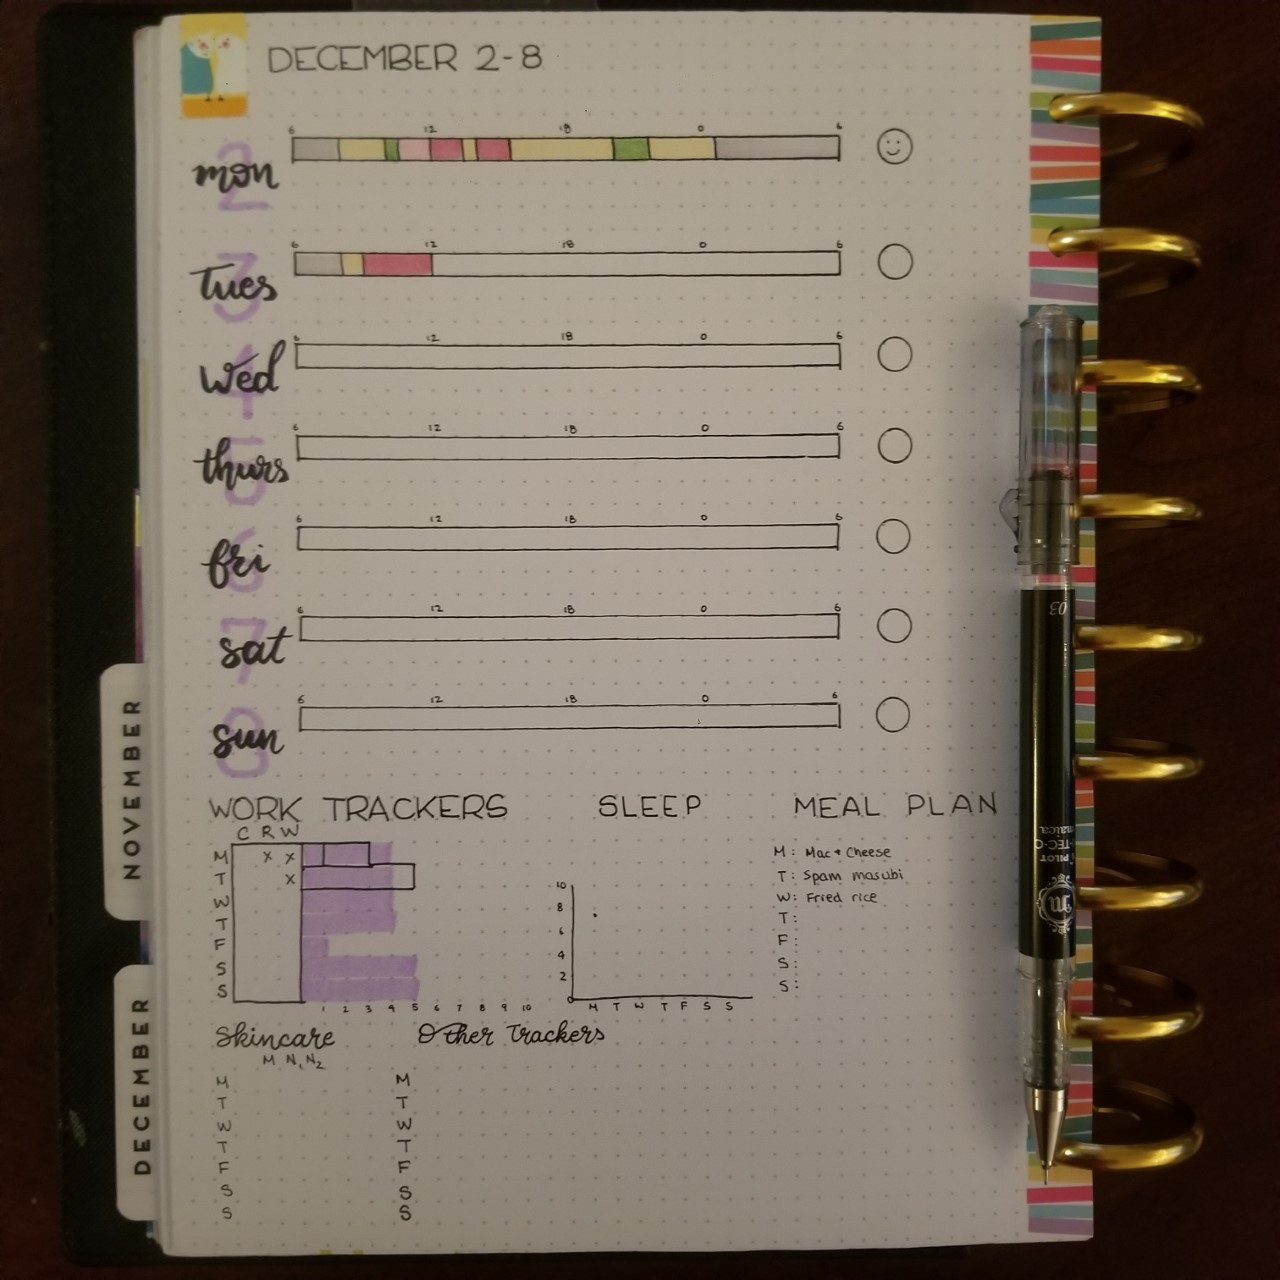
Here’s a template of the weekly tracker page I use now. On the top of the sheet is my time log, on the bottom is a group of other trackers. (Disclaimer: this picture, and all the pictures in this blog post, are not real. While I do use this habit tracking template, I am not using real information to fill out the time log or habit trackers below).

 
An example of a weekly habit tracker page.

An example of a weekly habit tracker page.


The Time Log

On the top half are time trackers (sometimes known as a time log, since 1 page has 7 time trackers). Each row has 24 boxes: one for each hour of the day. My days begin at 6 a.m. and end at 5:59 a.m. the next day, so the first box of the day is 6 a.m. to 7 a.m.

 
An example time log. In this example, I am midway through my Tuesday.

An example time log. In this example, I am midway through my Tuesday.


I use a combination of seven or eight colors to identify out what I’m doing at any given point. Sleeping (which is grey), “down time” (orange), and meetings (purple) are common things to track. I also track reading (pink), writing (red), programming (blue), hand coding (light blue), and “misc work” (green). These more detailed codes allow me to really see where my work time is spent on any given day.

Writing, in particular, involves a lot of different tasks. The three that are the most common for me are: outlining, new writing, and proofing. If I want to provide more detail about what I’m doing when I’m “writing”, I’ll mark a box with “O” for outline, “W” for new writing, and “P” for proofing.

Underneath each time tracker, I will write notes and details about that day, things that add context to the day’s data. This includes (but is not limited to): social functions I attend, exam days, major grading days, conference deadlines, travel days, and sick days.

Other Trackers

Below my time log are templates of a few other trackers. I don’t actually use all of these; I just wanted to present different ideas of trackers you may be interested in.

Some example trackers. In my day-to-day, I do use the work tracker and the skincare tracker.

Some example trackers. In my day-to-day, I do use the work tracker and the skincare tracker.

Work Tracker

I do use a work tracker: it’s a 7x3 matrix, with each row representing a day, and each column representing a task (c = coding, r = reading, w = writing). While I already track these tasks in my time log, they’re important enough that I also want to record when I do all three daily; I like day when I code a little, read a little, and write a little.

tracker_3.png

To the right of this 7x3 matrix is a set of purple bars. Those are the number of pages I hope to write daily (my estimate). I draw a rectangle to represent the number of pages I write in a given writing session (my observed)—1 box for 1 page, 3 boxes for 3 pages. This allows me to see the days I’ve hit my writing goals… and the days I haven’t.

The combination of my time log and my writing page tracker allows me to see how much I’ve written per hour. Sometimes, the words flow out easily and I can write 1 or 2 pages in an hour. Sometimes, it’s really hard to produce good writing.

Other Trackers

I do track a variety of other, non-work tasks. These range from the mundane habits, like brushing my teeth or showering, to hobbies, like baking and doing calligraphy.

For most of these tasks, each box represents one task per day (similar to my work tracker, the columns are the tasks and the rows are the days). It’s easy to vary up these tasks based on my needs that week, or things that I want to improve on. For that reason, the list of habits that I track change week-by-week.

Sometimes, I want to keep track of a more complex habit (e.g., taking multiple types of medication or my skincare routine). For this, I’ll often use a frankenlog system.

The Frankenlog

The goal of the frankenlog system frankenlog system, generally, is to jam as much information into a single page of your bullet journal. This is a great, minimalist strategy that gives you a “bird’s eye view” without sacrificing the detail.

One of the awesome features of the frankenlog is the “four mark” daily habit box. Each habit is tracked with a single pen stroke, allowing for four habits to be tracked with one box.

I use this system to track my skincare routine. In the morning, I have four tasks: face washing, toner, vitamin c extract,  and sunblock. In the evening, I have seven or eight tasks: face washing, micellar water, toner, face mask (sometimes), eye cream, hyaluronic acid serum, retinol, and night cream.

 
An example of a frankenlog habit tracker. Each “box” can track up to four different tasks or habits. In this skincare example, I have 4 morning steps and 8 nighttime steps.

An example of a frankenlog habit tracker. Each “box” can track up to four different tasks or habits. In this skincare example, I have 4 morning steps and 8 nighttime steps.


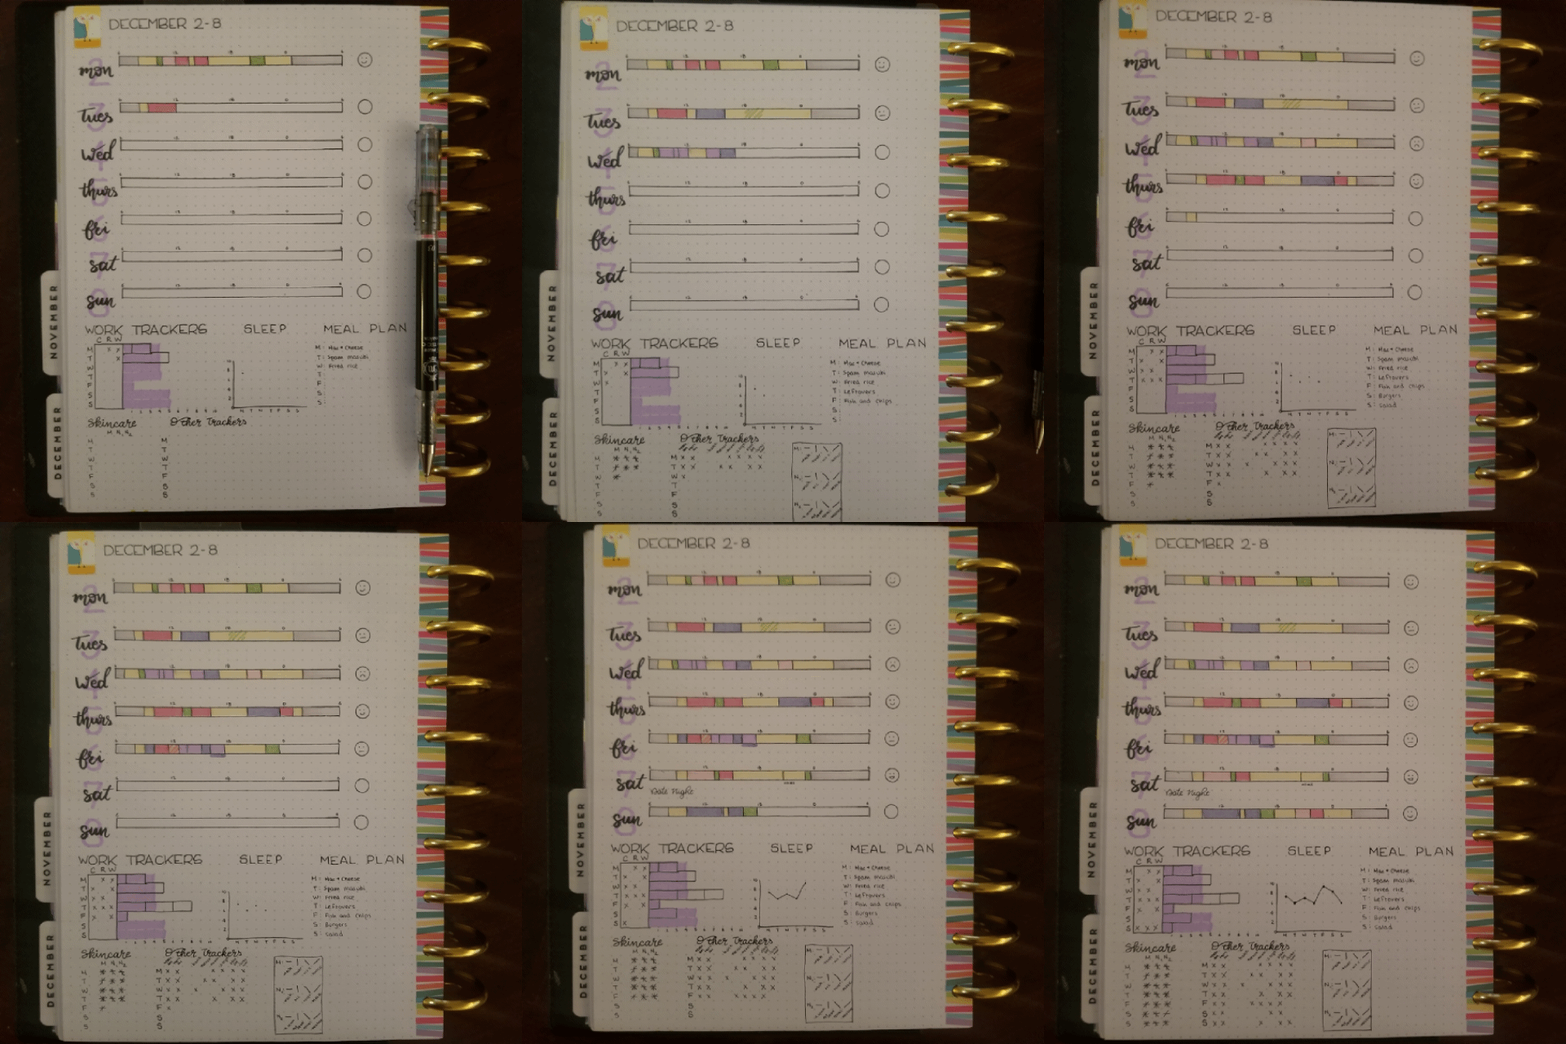
Weekly trackers give me a good sense of what I’ve been doing that week. This helps me make sure I’m living a (relatively) balanced life—time for work, for friends, and for myself. Plus, I love to see the bars fill up over the course of the week.

Example time lapse of a week’s worth of habit tracking information.

Example time lapse of a week’s worth of habit tracking information.

My Discbound Zettelkasten

My zettelkasten is the heart of my long-term notes. The German word “zettelkasten” literally translates into “slip box” (as in slips of paper). Built properly, it acts as a system of notes that you communicate with and, over time, learn from.

The premise is relatively simple: a zettelkasten is a collection of notes (think flash cards, but for comprehension and not rote memorization). Each note (or “zettel”) is a thought, bit of information, or concept. My zettels typically contain a keyword or phrase, some definition(s), relevant authors, and possibly causes/effects (antecedents and consequences of the concept).

Zettelkastens can be online and offline. In fact, I first learned about the zettelkasten system from Beck Tench, who uses a Zettelkasten via Tinderbox.

My zettelkasten is physical (surprise, surprise). For some time, I used regular index cards. However, when I switched to a discbound planner system early in 2019 (see my scheduling system here), I decided to also create a discbound zettelkasten. This allowed me to flip through my zettels and take them out to organize them in interesting ways.

 
An prototype of my zettelkasten. I took this picture while transitioning some of my old zettels into the final discbound zettelkasten.

An prototype of my zettelkasten. I took this picture while transitioning some of my old zettels into the final discbound zettelkasten.


Each zettel is a 4x3 index card, which is the size of the micro happy planner. I punch disc holes on one of the long sides of my zettels.

I keep my zettels in loose alphabetical order, so they’re relatively easy to find. I would discourage organizing one’s zettelkasten by topic or something because it may discourage unusual and surprising combinations of concepts (this is one way your zettelkasten “talks to you”).

Zettelkasten Key

Though I don’t formally organize my zettels (aside from alphabetically), I do ID each card with a unique alphanumeric sequence. Whenever I reference the zettel, I include the ID (both online and offline). My ID is a little complicated: the date of creation, followed by a field tag, a level of analysis, and a keyword. It typically looks something like this:

20191222CT0001word

20191222” is the date (2019-12-22). “CT stand for the field (Communication Theory). “0001” implies an individual-level idea. Finally, “word” is the keyword.


Understanding my identification system. This is the first page of my zettelkasten. The stickers and washi tape were gifted to me by fellow grad students in my department!


Identification systems do not need to be nearly as complex as mine, but they do need to help you produce unique identifiers. When I reference Zettel A in in Zettel B, I’ll write the ID of Zettel A into Zettel B.

Writing the Zettel

In addition to an ID, my zettel also includes:

  • The concept, usually a phrase or word. One zettel should be one “piece” of information. I also have dated zettels to refer to historical events (like the American Revolution, WWI, and the establishment of GATT.

  • A brief definition or explanation of the concept. Sometimes, I’ll reference other zettels.

  • On the back of my zettels, I have post-its referencing the other zettels (with the concept and the ID) and the names of relevant scholars or citations of relevant articles.

 
Front of Zettel

Front of Zettel

Back of Zettel

Back of Zettel


Combining Zettles

To write literature reviews, I take out my zettelkasten and combine multiple concepts in a “physical mind map” (If I like it enough, I’ll write it out as a cohesive flow chart and will digitize it).


One of the first times using my zettelkasten prototype. In the upper left corner, you can see the ways in which I combined the zettels to make a claim.


In this process, I often treat my zettels as nouns or verbs. Arrows are usually verbs or prepositions. I then use these zettels to create first drafts of my thesis statements (for short memos and articles, in particular).

Book Logging and The Zettelkasten

As I mentioned in my previous blog post, I use an open circle bullet (o) to indicate an idea I want to put into my zettelkasten. Sometimes, I want to write new zettels. Other times, I want to add to already-existing zettels. In the case of the latter, I’ll write that zettel’s ID in my notes, so my book is also “linked” to my zettelkasten.

When I add the information to my zettelkasten (either as a new zettel or when expanding on an already existing zettel), I fill in the circle. I try to scan my book log once a week to transfer concepts to my zettelkasten.

This process is great because it allows me to review my notes. When I want to add new notes, I use a different colored pen, so I know what my original comments were and what my newer comments were.

Book Logging

Over the past year, I’ve been experimenting with different ways to take notes on what I read (mainly books, research papers, and academic articles). While doing my coursework, my reading strategy was haphazard and very course-dependent. Sometimes, I would take notes in-line. Other times, I would write them down on post-its or loosely organized sheets. This worked well enough for individual projects… but it is unruly as a long-term collection of notes.

Since my preliminary exams, I’ve been using a dedicated reading journal, which I highly recommend (all the pictures I use in this post come from that reading journal).


An early entry of my book log, for Tomasello’s Becoming Human . I would write the page number on the far left side (highlighted by different chapters), and then the notes to the right. Sometimes, I’d include notes in different colors or post-it’s if I wanted to move concepts around.


At the beginning of my book is an Index, which lists the books or articles that I have reading, and the page I begin my notes for that book or set of articles.


My Book Index, with some notes (in red).


Since last month, I’ve started using the book log strategy from the Bullet Journal site. I’m a fan of bullet journaling in general, and the original bullet journal method is great for those looking for a planner/to-do list/organization system (you can learn about the bullet journal rapid logging system here, and I highly recommend the 5-minute video tutorial here).

This system is originally made for books, but you can also use this system for journal articles you read in class or for a project.

What makes the book log system unique?

  1. Chapter Index: Reading notes begin with a chapter index. This is usually the table of contents for a book. If I were reading articles for a class or research project, I would list all the articles here. I was somewhat irked with the time it took to write down all the chapters, but it has been absolutely worth it when I come back to old notes.

  2. “Treading”: When I take notes and want to point to a specific part of the book, I write the page, paragraph, and line number down. (This is not quite the same as bullet journal threading, but it has a similar principle). As the blog post recommends, you can use a “^” arrow to indicate “same as previous” (like an “ibid.”).

  3. Different bullets: Like rapid logging, the book log system several different “bullets” to indicate different types of notes and tasks. The ones they recommend are dashes for regular notes (this is the most common bullet for me), a quote for quotes, and a dot for tasks.

- dashes

“ quotes

  • tasks

I added two (well, three) more to this list:

= for combining ideas

? for questions (I haven’t used this, but I imagine it would be useful in class or guided reading)

o     I use an open circle for incomplete tasks. I fill it in when the task is complete*

(* the only tasks I really have in my book log, however, is to add to my zettelkasten.)

These six “bullets” collectively constitute my key.

 
Book Logging Key

Book Logging Key


How do I use this system?

I begin by writing out my chapter index. Though the book log system recommends writing the chapter in as you read it, I actually wrote down all the chapters I was interested in at the beginning. When I take notes for a chapter, I write the first page of those notes on the far right.


Some notes I took from my first attempt using a book log, while reading a research paper about Foxconn and targeted economic development (Mitchell et al., 2019).


Underneath the chapter index, I will have space to write some main points from the book. This typically includes a “purpose statement”: one sentence about why the author wrote the book or what the author hopes to accomplish with the book.

When I read a chapter, I write “CHAPTER #” and then take notes below that. I do my threading on the far right of the page (at the minimum, I usually write the page number). All my threads are highlighted so I can find them easily.

What if I’m reading a couple of articles?

I haven’t used this method as much for reading articles, but I imagine it would still be useful. I did read a set of articles about North Korea, and I found it was useful to read related pieces in 4-5 article batches. In this case, I treated each article as a “chapter.” I wrote an article index, with the “key points” section beneath. Like chapters, some articles are more or less useful than others. I also use the citation shorthand (AUTHOR, DATE) instead of the chapter number. I thread similarly, but I add a column number (page, column/paragraph, line).

For seminars, I would recommend treating each class session as a batch.

What do I take notes on?

Before I started using the book log system, but after I started taking notes in a book, I was asked to do a presentation on organizing your notes. One student had asked me “how do you know what to take notes on, instead of writing everything down?”

At the time, I gave a very lackluster answer: I followed my gut. I’ve been frustrated with that response ever since, which got me thinking about my note-taking process. And, of course, when I think, I read. Andrew Abbott’s book Digital Papers had a great chapter on Reading (Chapter 7). He describes several “modes of reading”: (1) narrative reading, (2) meditative reading, (3) scan reading, (4) mastery of argument reading, (5) party mastery readings.

This typology is great for thinking about what information you want to extract from reading—and what notes you want to take. I use my book log for meditative reading and when I am trying to understand (or “master”) the core argument of someone’s book or article. For this reason, having a “purpose” or “key points” section below my chapter index is really useful, and keeps my focus on the goal (comprehension).

In books, the first few chapters tend to be the most theory-laden, with the subsequent chapters or parts focusing on proof (either statistical, qualitative, case-based, or some combination thereof). I spend a lot of time on these earlier chapters and tend to write the most notes for them.

Going beyond the book

One of the things I’ve struggled with the most is how I translate notes in my book into a broader collection of “ideas” between multiple books. One of the ways that I do so is my combination bullet (=), which I use if what I’m reading reminds me of another author. These notes help me connect multiple authors or concepts in-the-moment; in other words, it’s great short-term.


Some notes I took while re-reading Jeffrey Alexander’s The Civil Sphere. While reading, I connected some thoughts between Alexander and Parsons. You’ll also see that I wrote a quote down verbatim from chapter 3.


For the long-term, I rely on my zettelkasten, which I’m hoping to talk about in my next blog post.

Research Pipeline: Tracking Your Papers

One of the most important things you have to do as an academic is keep track of your projects—and, by extension, your papers. Like many researchers, I get interested in a lot of projects and (dare I say it) I tend to over-commit (*unsurprised gasp*). But keeping track of my projects helps me be realistic about what I can accomplish and what I have on my plate.

The most common way to track your projects is to use a “research pipeline” (also known as a publication pipeline). This metaphor is extremely useful: between when you conceptualize the project to when you publish the paper is a whole mess of steps including (but not limited to): data collection, data analysis, writing the paper, and revisions (and revisions, and revisions, and revisions). By breaking up your project into steps that build on each other, it makes producing research and writing up your results more manageable.

These steps are not always linear. When you receive a revise and resubmit a full paper, reviewers may ask you to redo a part of the analysis. The manuscript itself may even go through several complete rewrites before it is accepted to a journal. And book projects may have entirely different pipelines.

A simplified “rule of thumb” for your publication pipeline is the 2-2-2 (two in development, two in data analysis, and two under review; though I’ve seen variants with different 2’s).

However, as many articles have pointed out, there are lots of intermediary steps that should be recognized. Suggestions range from anywhere between seven and eleven (or more). My pipeline has 9 steps.

In 2019, these were my steps: (1) literature/planning, (2) collect data, (3) compile data, (4) data analysis, (5) draft paper, (6) full paper, (7) conference/under review, (8) R&R, (9) accepted!

In 2020, I modified my steps slightly: (1) idea nursery, (2) data plan/IRB, (3) data collection, (4) data analysis, (5) draft paper, (6) near completion, (7) under review, (8) R&R, (9) accepted!

The main changes are in the first half of the pipeline. I expanded out my “literature/planning” step into two steps: the idea nursery (which I read a lot of literature to understand the question’s domain) and the data planning (where I think about what data layers and analyses I need to answer the research question I’m interested in). The data planning is critical for me: different projects demand different types of data plans. Survey experiments and semi-structured interviews, for example, must go through IRB approval. In projects relying on a large text dataset, I have to think about how I want to construct my corpus.

After this, my steps are fairly consistent: collect the data (i.e., execute the data plan), analyze the data, draft the manuscript, complete the manuscript (“near completion” was a better descriptor for me than “full paper”), submit the paper to a publication (or conference), receive and complete an R&R (if submitting to a publication), and getting the paper accepted. When a paper under review is rejected, I move it back to the “near completion” stage (or earlier if I need to do more).

For projects that I want to shelf, I treat the back of my page as a literal “shelf.” In 2020, I split my shelf into a “short term shelf” (things that I want to pick back up within the year) and a “long term shelf” (things that I want to go back to, but probably not for some time).

How do I keep track of the pipeline?

I’ve used a variety of different strategies to try and keep track of my papers. First, I used to list them all on a sheet of paper and cross out the paper when it had been accepted. This was a good first step, but it didn’t really help me understand the stage my paper was on.

Now, I use a physical pipeline with post-it notes. I got inspiration from this bullet journal spread, which uses a similar strategy (there are 12 steps in this pipeline). The original spread has a color-coded system (green for dissertation, orange for side projects, and yellow for postdocs), but I am more haphazard.


My 2019 Pipeline! Thanks for helping me keep track of this year’s papers!

Moving my post-it’s to my 2020 pipeline!


May of my projects turn into multiple papers. For each project, I have a 2-6 letter key (“SP” or “Debate” or MCRC”). Papers are indicated with an additional word. For example, my paper on Russian IRA disinformation in the news was “SP News”. My paper on cross-platform Russian disinformation was “SP 3media”.

Each paper is indicated with a post-it note. I like to keep track of papers rather than projects because my projects are prone to branching into multiple papers. When I complete a step, I move the post-it for that paper to the next stage. However, I can also go backward: when I have to redo some analysis for a paper, I move my post-it from “Under Review” back into “Data Analysis” (or even “Data Collection”).

When a paper is accepted, I write the paper down in my last box (“Accepted!”) and throw away the post-it note for that paper. I like the permeance of writing the accepted/in-press/published paper down. I’ll also put a little exclamation mark for accepted papers that are single-authored or first-authored.

In conclusion: tracking your research/publication pipeline is really useful for understanding what stage your project is at. I encourage reviewing your pipeline at least once a month and updating the pipeline yearly (especially if you’re still trying to figure out the most optimal steps in your pipeline… which may change as your research interests change).

Daily Scheduling

If my weekly (master) to-do list is looking at the forest, my daily to-do and schedule are the individual trees.

My Daily To-Do List

My daily to-do list is a selection of tasks from my weekly to-do and minor to-do’s that come up over the course of the day (things like taking out the garbage or responding to that email… or posting on Twitter). This step is not super necessary, but it is the middleman between my weekly to-do list and my scheduler.

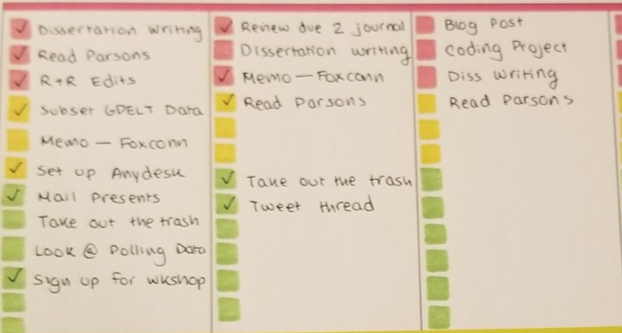
Here are 3 days of to-do lists.

Here are 3 days of to-do lists.

Sometime in the summer of 2019, I started color-coding my tasks by priority. I have three red boxes for “high priority” tasks, three or four yellow boxes for “middle priority tasks” and about six or seven boxes for “low priority tasks.”

I often repeat long tasks that take me several days. I check off a task when I’ve worked on it that day (not necessarily when I complete it—that’s what my master to-do list is for). In the above example, I just wrote “Dissertation writing” or “diss writing”, but I tend to be more specific (e.g., what chapter of my dissertation am I working on?)

My Schedule

Once I’ve written my to-do list, it’s time to work on my schedule for that day. Right now, I’m using my Happy Planner to schedule my days. I really like writing out what I’m going to do the next day. I know many people prefer to be high-tech, though (most people have an iCal, gCal, planner, scheduler, or something digital). I’ve had both a Google calendar and a planner for the majority of my time in higher education (there were one or two years where I gave up on the physical scheduler).

For a while, my primary schedule was digital (Google Calendar). This was great when I took classes or was a Teaching Assistant because I had to work around major blocks of time (i.e., classes). But since I’ve started dissertating, I’ve switched almost completely over to my planner. I like being able to see my to-do list and my schedule side by side, and I couldn’t really replicate that effect with Any.do + gcal.

Though I may go back to a hybrid system in the future (where I maintain both a planner and an online calendar), it’s unlikely that I will ever go “full digital” again. There are just too many benefits to maintaining a physical planner. You don’t have to worry about having an internet connection, for one. I find that I remember my schedule better when I write it down, as well. There has been a resurgence of planning on paper in the past few years (see all the news articles discussing this in WSJ, NYT, Vox, and CNBC)!

Planners also don’t have to be too expensive. Sure, some people dish out upwards of $60.00 for their planner. But you can easily maintain a physical planner with a one-dollar notebook and a pen using the bullet journal strategy.

To make my schedule, I use a strategy called time blocking.

Time Blocking

Time blocking refers to planning out “blocks” of time to do various things. Time blocking is a great strategy for young academics because it (theoretically) forces you to devote long periods of time to a task, whether it is reading, writing, programming, analyzing, or something else.

You can time-block regardless of whether you use a digital or analog system. Below is an example of a digital time blocked schedule in April 2017 (When I was a teaching assistant and taking classes). I’ve color-coded many of my tasks: light green is for my own classes, dark green is for my research groups, blue is for the class I was a teaching assistant, light red for reading, dark red for writing, purple for programming, and seafoam green (“peacock”) for hand coding (for a traditional content analysis). Color coding online (or offline) can be really useful—it’s a way to quickly see what you need to do.

My time blocked schedule from a week in April 2017 (when I was still working as a teaching assistant and taking classes). I do have some gaps in time, so not all of my time is completely organized. But it does what I need it to do, and that’s the most important part!

In my physical planner now, I block time by assessing what I need to do for that day, estimating how long it takes to do that task, and trying to find a block of time to fit into my schedule. For example, if I know I want to dedicate 3-4 hours to working on a paper, I’ll look for a time in my schedule to fit that in.

Here’s what my planner looks like now. Happy Planners with a vertical layout (like mine is) are blocked into thirds. I used the first box to write my to-do list and a second box to write my time blocked schedule. My third box is a wild card: I’ll put quotes in it, grocery lists, or agendas for meetings.
Vertical planning layouts mean that you plan vertically (in columns). Each day is a column. Some vertical planners are already time-stamped. Horizontal planning layouts, on the other hand, have wider and shorter spaces for their days. Days are stacked on top of each other.

Time blocking may seem overboard (“you mean I have to schedule all my time?”*) but there is a big payoff: I get more work done and have dedicated time to major projects, and I force myself to have breaks by blocking them in. This is very important: taking time off is important, and scheduling in a break is better than not taking a break at all.

My time blocked schedule is also an estimation—the only person forcing you to your time blocked schedule is yourself. It is rare that my time blocked schedule aligns perfectly with reality. Like most people, I tend to overestimate what I can do (we all do; it’s called planning fallacy). Or, there are days where I just crash. When this happens, it’s important to not be hard on yourself. A time blocked schedule is supposed to help you, not make you feel like shit.

Sometimes, advocates of time blocking say that it prioritizes your work. This is true to some extent—but it’s not the point of time blocking; at least, it’s not to me. Time blocking prioritizes your time: you only have so many hours in the day to live (to work, to relax, to create, to think, to thrive, to cry, to eat, to poop, to sleep). Time blocking, at least the way that I use it, helps me maintain a balance between work and life. I put in break times because I know I can’t work 24/7 (or at least, I know I shouldn’t or I will burn out). Time blocking allows you to prioritize what is important. That might be work, or that might be your creative endeavors after work, or time for you to hang out with friends.

* Obviously, you don’t have to schedule all your time away. In my digital calendar from 2017, I obviously had gaps of time.

When do I do all of this?

At the end of the day, I write my to-do list and my schedule for the next day. It’s usually one of the last things I do. I’ve tried to write my schedule on the morning of that day, but I’ve had less success with that (some people do prefer to plan in the morning, though). Here are my steps:

  1. Review my Master to-do list. Is there anything urgent I need to consider or include?

  2. Write my Daily to-do list. I rarely fill out all the boxes at this point (if there are 10 boxes total, I usually fill about 5 or 6).

  3. Write my schedule by the hour (or half-hour). The first thing I think about is when I need to wake up for that day.

  4. I then fill it in with meetings and major deadlines.

  5. I finally time-block my remaining time. Conventional wisdom suggests that the first few hours of your day are your most productive. I like to get a lot of writing or coding out of the way in the morning. I always make time for breaks.

Writing and Maintaining a Weekly To-Do

The core of my scheduling system is my weekly to-do list. When I have new tasks or things to do, this is where I write them down. I keep one to-do list a week; it is my master to-do list. During an academic week, my to-do list can range from anywhere between 20 and 45 items. My to-do lists are cumulative: that means I include work tasks (e.g., course assignments, reviewing papers, and writing) and personal tasks (e.g., baking, cleaning the fridge, and taking out the garbage).

Where do I write them?

When I first started writing weekly to-do lists, I used to write them on index cards, loose white paper, or college-ruled three-ringed binder paper. Now, I use dotted paper in my Happy Planner. 

What do they look like?

A mock to-do list. Notice that I have included work things (e.g., analyses for projects) and personal things (“Dye Hair”).

My to-do list is a pretty simple numbered list. Though I’ve used the same general system since high school, I’ve made two major edits that have really helped me out.

  1. I vary the length of my “check box” to indicate the length of time it takes to complete that to-do task. This is where dotted paper comes in handy because I can draw these boxes easily. I’ll also only draw boxes when I’ve started working on a task (that way, I’ll be able to see which tasks I didn’t work on that week).
    Most of my tasks have one to three boxes. One box is a relatively short task (e.g., writing a rec letter, sending an email). Two boxes indicate that the task is longer (e.g., writing a blog post, reading articles). Three boxes are for the longest tasks (e.g., writing part of a paper, grading, finishing coding tasks). Sometimes, especially when I’m collecting data, I’ll have longer boxes (e.g., if I’m collecting news articles for a constructed week, I’ll draw seven boxes).
    When I finish a task, I “x” out the number and color in the checkbox (like Task 5)

  2. Many of the things I do require multiple steps. I’ll “thread” related action steps by writing the second task next to the first task’s check box. This is especially useful for data analyses. For example, if I need to: collect tweets, analyze them, create a graph, and then write a blog post, I’ll write this as multiple steps on one row.
    We can see this in the example to-do list. Task 8 requires me to grade first, and then put the grades in the gradebook. In this example, I’ve finished grading, but I haven’t put them in the gradebook. Task 10 requires me to collect data first before using the data in a lesson plan. I’ve planned to do this task, but I haven’t started on it yet.

  3. For tasks that are urgent or must be done by a certain date, I indicate that task with a star and/or I write the due date of that task to the far right. To do this, I use an erasable red Frixion pen (I like being able to erase the stars). Honestly, I don’t think how you indicate it matters (you could highlight your task, or use a permanent pen, or something else), but you need a way to signal to your brain that this task has a looming deadline.
    In this example, Task 7 (read book chapter 1 & 2)is important. Task 8 and 10 are due Friday. It may not be urgent on Monday, but I would likely put stars next to these tasks by Wednesday.

    When I am done with a task with a star, I erase the star on that task and cross the task out as I normally would.

Notice that Task 6 (7-day data collection) has 7 boxes. Task 8 (grading) is a lengthy task (once I grade something, I have to also record it in my gradebook, which is a fairly quick process), Task 7 (read book chapter 1 & 2) is a medium-length t…

Notice that Task 6 (7-day data collection) has 7 boxes. Task 8 (grading) is a lengthy task (once I grade something, I have to also record it in my gradebook, which is a fairly quick process), Task 7 (read book chapter 1 & 2) is a medium-length task, and task 9 (scheduling a meeting for a project) is a short task. I have completed Task 5 (Zettelkasten Update). I’ve started on Task 3 (blog post) and Task 7, both of which are “urgent” (marked with a red star), but I' haven’t completed them.

Why use to-do lists?

This to-do list is very important to me because it is my “task dump”: it is a centralized location for me to check. When I look at my to-do list, I get a sense of what I need to accomplish. I can also tell when I’m taking on too much (e.g., when I have 40+ tasks). 

I haven’t fully completed a weekly to-do list since my last year in high school (I distinctly remember exclaiming my excitement during an AP Java class), and I write the to-do list knowing I will have to transfer several tasks to the next week (especially if I write them down on Friday, which is when I write a lot of my tasks).

When I took classes, I would try to put down my upcoming assignments at least two weeks in advance. For courses with term papers, I will break down the paper’s task into smaller increments (read articles, collect data, analyze data, write parts of the paper). I’ll then turn these smaller pieces into various action steps that I thread together (e.g., read these articles, and then write a short memo about them; grade these assignments and then post them on Canvas).

How can I do this digitally?

I’d be remised if I didn’t extoll the virtues of writing by hand, if possible. There are a lot of benefits to writing your to-do list by hand, including increased retention, the ability to practice your handwriting, and time to reflect on your tasks.

However, I understand that it might not be possible for all people. The key to maintaining a weekly to-do list is to have one centrally located place for it, regardless of where it is. You can’t maintain a different to-do list on your phone, your computer, and on different post-it notes and hope to have a handle on everything you have to do.

On your computer, you can use a sticky note application (Sticky Notes/Stickies/Xpad) to maintain a running list. If you have multiple sticky notes, you want to make sure your “Master To-Do List” is always noticeable, and probably a different color from the others. Though you won’t need to migrate tasks week by week, you should take an hour a week to assess your tasks, determine how much progress you’ve made on important ones, and remove tasks that are no longer necessary.

Want an app for that? There are also many to-do list/task manager phone apps. When I maintained a digital-dominant scheduling system (about 2 years ago), I had a digital to-do list that I would replicate in writing. During this time, I really enjoyed using Any.do because of its simplicity, but there are many other apps you can use.

What about color-coding tasks?

I’ve often tried to color-code my tasks (e.g., write all my coding tasks in green, and all my reading tasks in red, and all my grading tasks in purple), but I’ve found that what I gain from that information isn’t worth the time it takes to switch between colored pens. I also don’t carry around my colored pens everywhere.

On occasion, I do decorate my task list with interesting quotes, stickers, creatively handwritten notes.

Decorating your to-do list is also a good way to practice your letter writing and/or calligraphy (or doodling).

Decorating your to-do list is also a good way to practice your letter writing and/or calligraphy (or doodling).

What if I want different to-do lists for different things?

Some people like keeping multiple to-do lists (for example, I have daily to-do lists that are subsets of my weekly to-do list). This is especially common when you teach: you may want to keep your work plans separate from your personal plans.

In these cases, I would still encourage maintaining one master to-do list, but I would write my teaching tasks as generically as possible (“write lesson plan for X”) or my master to-do list would refer to my teaching to-do list (“complete tasks 1-3 in my teaching to-do list”).

You can absolutely have multiple planners/journals (one for personal, one for research, one for teaching/lesson plans) but still maintain one to-do list.